Processing manual data exports with Power Query and Dataverse
I've recently been working on project with a requirement to ingest small datasets into Dataverse to serve a Power App. There were (unfortunately) no programmatic export options for this source data - exports were done manually via a reporting interface and gave the user spreadsheet extracts of 1000 records at a time. Additionally, data in the source system could be updated at any time, creating the opportunity for stale data and duplicate records in this downstream system. I needed to build a solution to process these extracts - merging all existing data extracts with the new extracts, and always promoting the latest data in the case of duplicate entries for a given record. This data then needed to be added to the existing Dataverse table, inserting new records and updating existing records (more here).
My initial instinct was to implement a solution using code with SQL and Python, but the solution was already entirely oriented around Power Platform (it was a Power App that was being developed!), so, I decided to take on the challenge and try and make use of the existing tools available: enter Power Query and Cloud Flows. (I initially tried to implement the whole solution with PowerQuery, however I couldn't figure out how to process the merge between the incoming data from the spreadsheets and the existing data in the target table - many thanks to my esteemed colleague Jonathan Ball for introducing me to Cloud flows and supporting me with this part of the solution!)
In this blog, I will walk through the steps to set up this process in your own environment to serve your own data processing use case. The walk-through will be broken into 4 parts; solution overview, ingesting files and data transformation, merging records from your staging table to the production tables, and creating the trigger flow.
1. Solution overview #
Let's take a look at the final solution design for what I delivered:
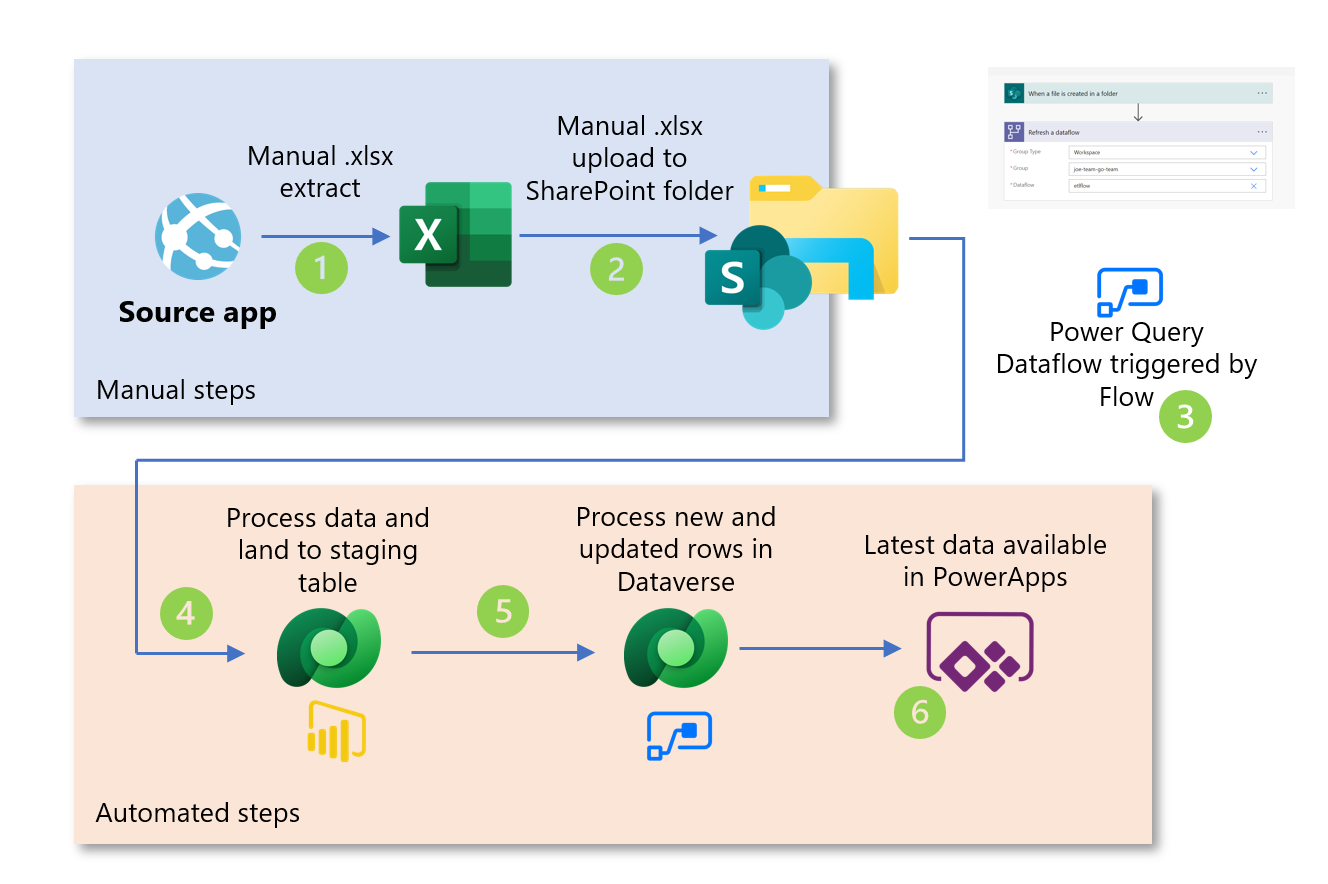
Processing flow #
- Required data extracted from application manually via built-in data export tool
- Exported file(s) are uploaded to SharePoint folder
- File upload triggers PowerApps Data Flow(s) via Microsoft Flow
- Data Flows process data to clean and conform data staging tables with Power Query. Records are de-duped, taking only the latest records from source for each unique record
- Cloud flows used to compare all inbound records to existing records in Dataverse, inserting new records and updating records that already exist
- Updated data available for consumption in PowerApps
2. Ingesting files and staging the data #
Creating and populating the landing zone #
First thing to do is provision the landing zone for inbound files. I used a SharePoint site in this project because these were already available in the environment and provided an easy, familiar interface for users to interact with.

- Create one top-level folder e.g.
etlfolder, with folders underneath this for each inbound dataset. The sub folders can be used to filter files in Power Query to ensure you are processing the right files with each flow (in situations where you are building more than one pipeline). - Upload some sample data files into this folder. For this example I will be working with these
dataexamplex.xlsxspreadsheets which you can download from GitHub.
Staging the data with Power Query #
The next task is to create a new dataflow with Power Query to ingest and land the data from your files into the staging table:
Create the Dataflow #
- In Power Apps, go to Dataverse > Dataflows and click
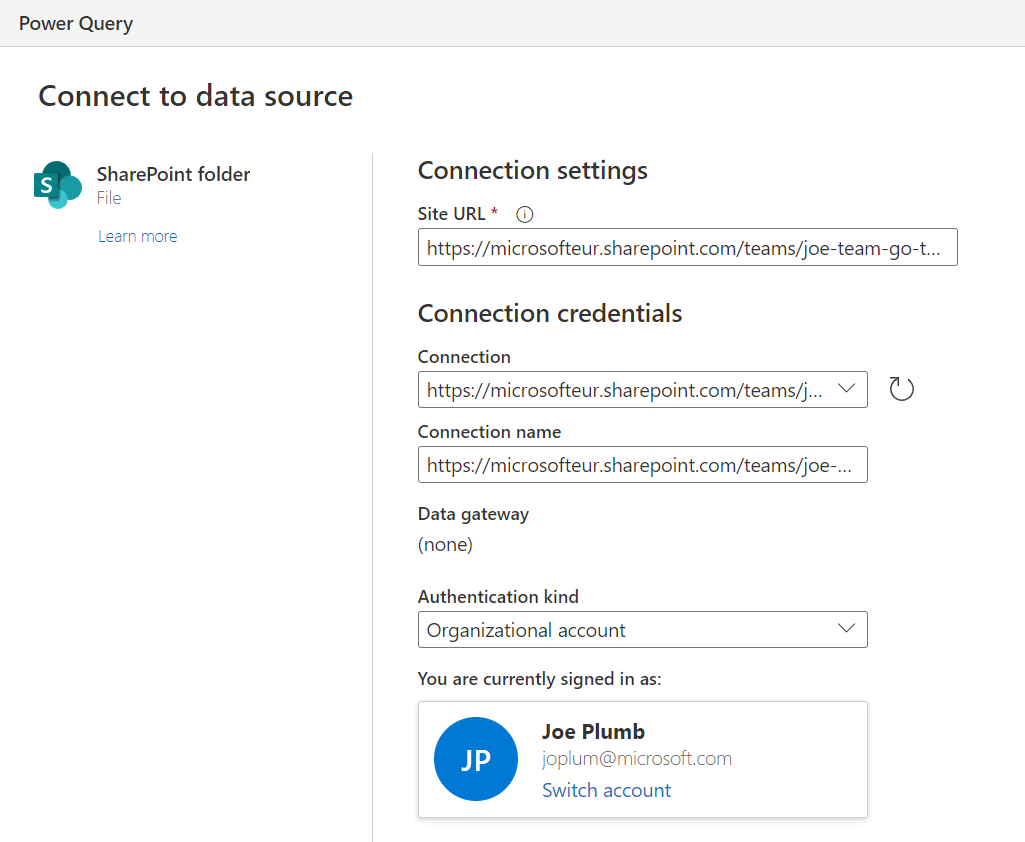
New Dataflow +. Give the dataflow a name and clickCreate. - Select the data source - for this example, we will be reading the
.xlsxfiles we have already uploaded to SharePoint, so selectSharePoint folder. Enter your SharePoint site URL and configure the connection credentials. ClickNext.
- A preview of the files you have uploaded into the folder will appear. Filter the file list if necessary, click
Combine, and wait for the Combine files dialog to appear. Select the sheet with your data in (e.g.Sheet 1), and clickTransform Data. Power Query will create some helper queries to unpack the data from all thexlsxfiles you have uploaded to SharePoint. If you experience errors here, or need to adjust the logic at all because of different source file types etc, you can find more details on the Combine Files approach in the docs.
You should now see the Power Query window with some helper functions and queries created for you, and all the rows of data from your files. Next, we will process and clean the data to only get the latest rows from your files.
Cleaning data and filtering duplicates #
- First, perform any additional data cleaning activities you require. Ensure data types are set correctly, remove rows with missing values, etc.
- Order the data by your
LastModifiedDatecolumn in descending order by clicking the arrow next to the column header and clickingSort descending.

- Next, we will use the
Table.Bufferfunction to force Power Query to load all the data into memory and ensure you always get the latest row when you filter out the distinct values - credit for this detail goes to Matt Allington of ExceleratorBI. Open the advanced editor for the query and wrap the last row with theTable.Bufferfunction e.g.
becomes#"Sorted rows" = Table.Sort(#"Changed column type", lastmodified)#"Sorted rows" = Table.Buffer(Table.Sort(#"Changed column type", lastmodified)) - Finally, remove the duplicates on your ID column by right clicking the column header and clicking
Remove duplicates

- Click
Next. In the map table dialogue, ensure the query you just created is set to load to a new table, and that the Unique primary name column is set to your ID column. Give the table a unique name. Check theDelete rows that no longer exist in the query outputoption. ClickNext. - Leave the refresh as
Refresh manually, and clickPublish.
Once the dataflow has been published it will run for the first time automatically - verify that you see the records in your staging table.
3. Merge from Staging to Production table #
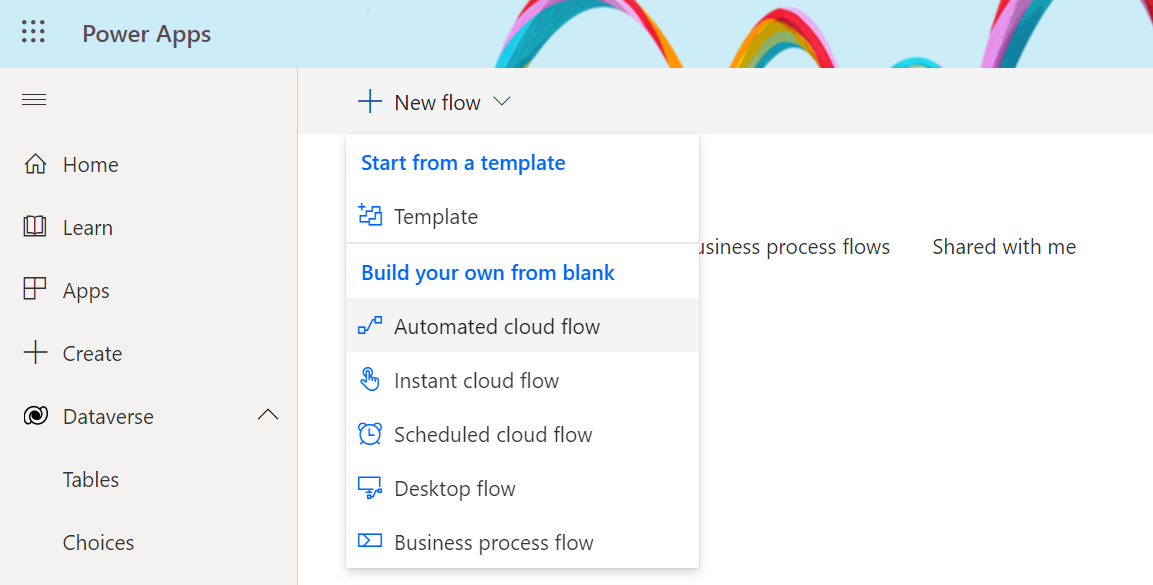
- Create new Cloud flow by navigating to
Flows>New flow>Automated cloud flow. - Give the flow a name, select
When a dataflow refresh completesas the trigger and clickCreate. - Populate the trigger with the details of the Power Query flow you created in the previous step.
- Build the rest of the flow with the following logic
- List rows in the staging table with the
List rowsactivity for Dataverse

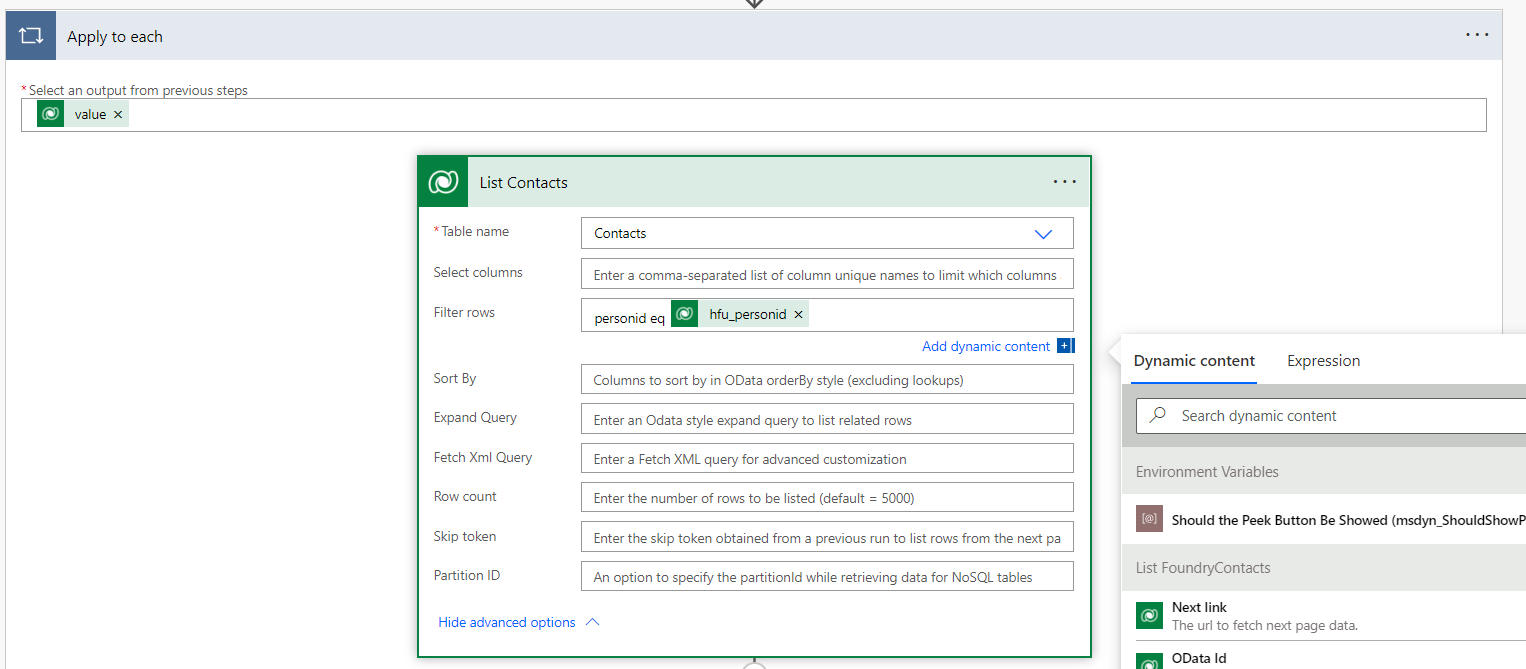
- Add a new step to list all rows from your production/target table with the same
List rowsactivity for Dataverse. Then go to the advanced settings and in the Filter rows section, add a condition to compare the ID column name for the target table to the ID value from the first List Rows activity e.g. TypeContactId eqthen click the Id value in the dynamic content window. Selecting the unique identifier from the Dynamic content section will embed this activity in anApply to eachloop.
- Still inside the
Apply to eachloop, add a condition activity with one condition. This condition will establish whether the record from the staging table exists in the target table. The condition should use expressions. The left hand side should beempty(outputs('List_Contacts')?['body/value']), whereList_Contactsis your second list activity. Selectis equal tofor the condition. The right hand side should betrue(make sure you add this as an expression).

- Finally, add the details to process the inbound records; in the
If yesfor the condition, add aAdd new rowactivity and select the target table. Map the columns in the target table to the columns from the dynamic content pane. In theIf nosection, add anUpdate rowactivity, referencing the same target table, and adding the same mapping between the columns in the target table, and the columns in the dynamic content pane for the row from the firstList rowsactivity. This will automatically add anotherApply to eachloop again - leave this as it is. NB: be sure that the ID column in your inbound data is mapped to the ID column on the target table.
- List rows in the staging table with the
- Once you have completed the above actions, you should have a flow that looks like the below

- Click
Save.
4. Creating the trigger #
Finally, Because we want this process to execute every time we upload more data, we need to create a new Automated Cloud Flow that uses the SharePoint "When a file is created in a folder" trigger. This will trigger the dataflow to run, which will in turn trigger the Cloud flow to run to update the Dataverse table.
- Navigate to flows in your environment and select `New Flow > Automated cloud flow":
- Give your flow a name, and select the SharePoint "When a file is created in a folder" trigger. When the canvas loads, update the metadata in your flow to reference the new landing zone folder you have just created for the inbound data files. Then, add a
Refresh a dataflowstep below the trigger and add the references for the cloud flow you created in the previous step. You should now have a flow that looks like this:
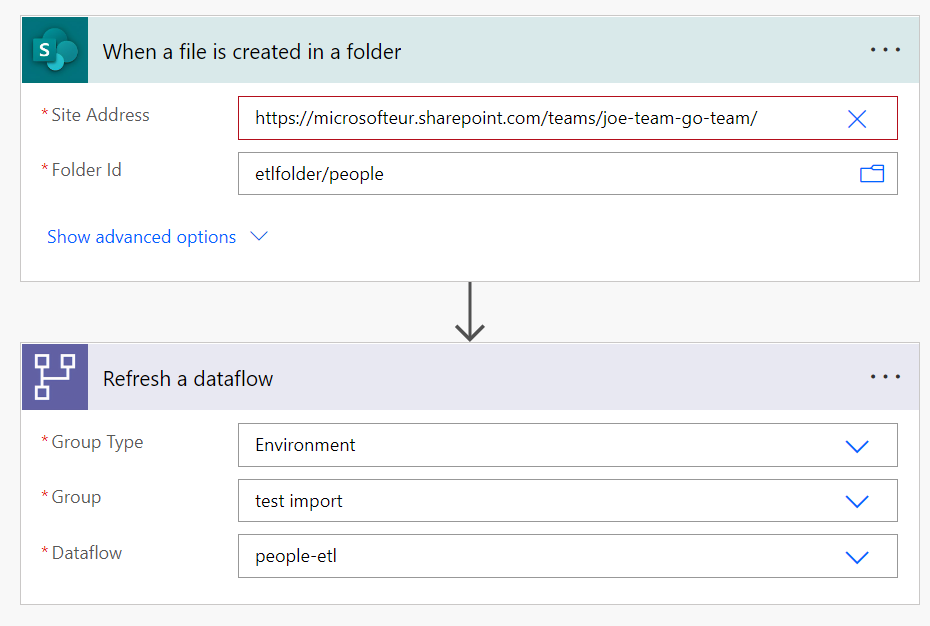
- The pipeline is complete! Save your flow and test the end to end process by uploading a new spreadsheet to the SharePoint site with some additional rows of data to check everything is configured correctly.
Conclusion #
In this post, I've covered how to build and automated pipeline to merge records from multiple point-in-time file extracts into Dataverse using Dataflows and Cloud flows in Microsoft Power Platform. Let me know if this was useful, good luck and happy building!
- Joe
Please message me on Bluesky if this has been helpful, or useless, or if you have any questions or comments!