Building analytical data systems with Azure Synapse: A rough guide
Over the last few months I've had the opportunity to spend more time working on enterprise analytics and business intelligence scenarios using Azure, based on the widely published and adopted Modern Data Warehouse architecture. It's been incredibly satisfying to refresh my visualisation and data modelling skills with PowerBI, and go deep on data orchestration and warehousing using Azure Synapse. As both a note to myself and a helping hand for others on the same journey, I wanted to reflect on what I've learned and share some key take aways after some hands on training and delivery of solutions for customers.
This blog will assume some familiarity with data processing patterns, tools, and techniques, and be broadly broken out into two sections; the process and approach to increase your likelihood of success, and technical considerations and decisions you'll encounter as you build out your MVP.
Process and approach #
Allocate time to learn the data #
If you're new into the problem space and datasets, make sure you allocate time to get up to speed with the data - depending on the complexity this could be anywhere from a few hours to a few days. If possible, include domain experts or people who are already familiar with the data structures and format on the team (or at least have a line of communication to them) to help answer questions that you will inevitably come up with as you get started.
BYOSQL (if you can!) #
One thing that is going to dramatically accelerate you is bringing your SQL from existing systems - table definitions (DDL), stored procedures, analytical queries.. anything you or existing users are already using is going to really help in the build out of the platform. It doesn't matter what system this is either, just make sure to allocate some time to make a few changes between the SQL code you have and T-SQL for Synapse as part of your sprint.
Reports and dashboards complete the vision #
There has been a lot of effort in recent years to make visualisation and reporting tools easy to use, and whatever tooling you have access to should make it relatively straight forward to build some impactful visualisations once the data model is in place. Being able to make good reports relies on a good understanding of the the data structure and clarity on the questions you or the user should be able to answer with the reports.
When thinking about what to build and how to build it, I generally recommend working with pen and paper - consider the questions you are looking to answer with the data, and start to think about what metrics and comparisons would be useful to see. Sketch out a low fidelity prototype (wireframe drawings are great for this) of the visualisation types, data, and overall report layout that you want to build to answer your questions. Once you've got something you're happy with, you can jump to the keyboard and start to build. This can be a great collaborative exercise if you're working as part of a team. You can also use these prototypes to walk your key stakeholders or sponsor users through what you're intending to build to get input and sign off (if required). This will radically reduce the time it takes to build your reports, and validate your thinking before you invest in implementing anything.
Don't leave without a map #
One of the key things to remember with any technical project is to plan ahead, know and agree the aims and outcomes, and review progress against this plan regularly as you go. Use the agreed scope and outcomes as your north star, as this is what you will be evaluating the outputs against when you come to the end of the sprint - you don't want to scupper the success of the team by getting sidetracked! Don't forget to also capture all the fun ideas you have along the way of things you could add - by capturing them you create an opportunity for these to be included in a future sprint.
Technical #
The flow of data through your MVP is likely to follow this common pattern. The focus of this post is on how to move through steps 1 to 3.
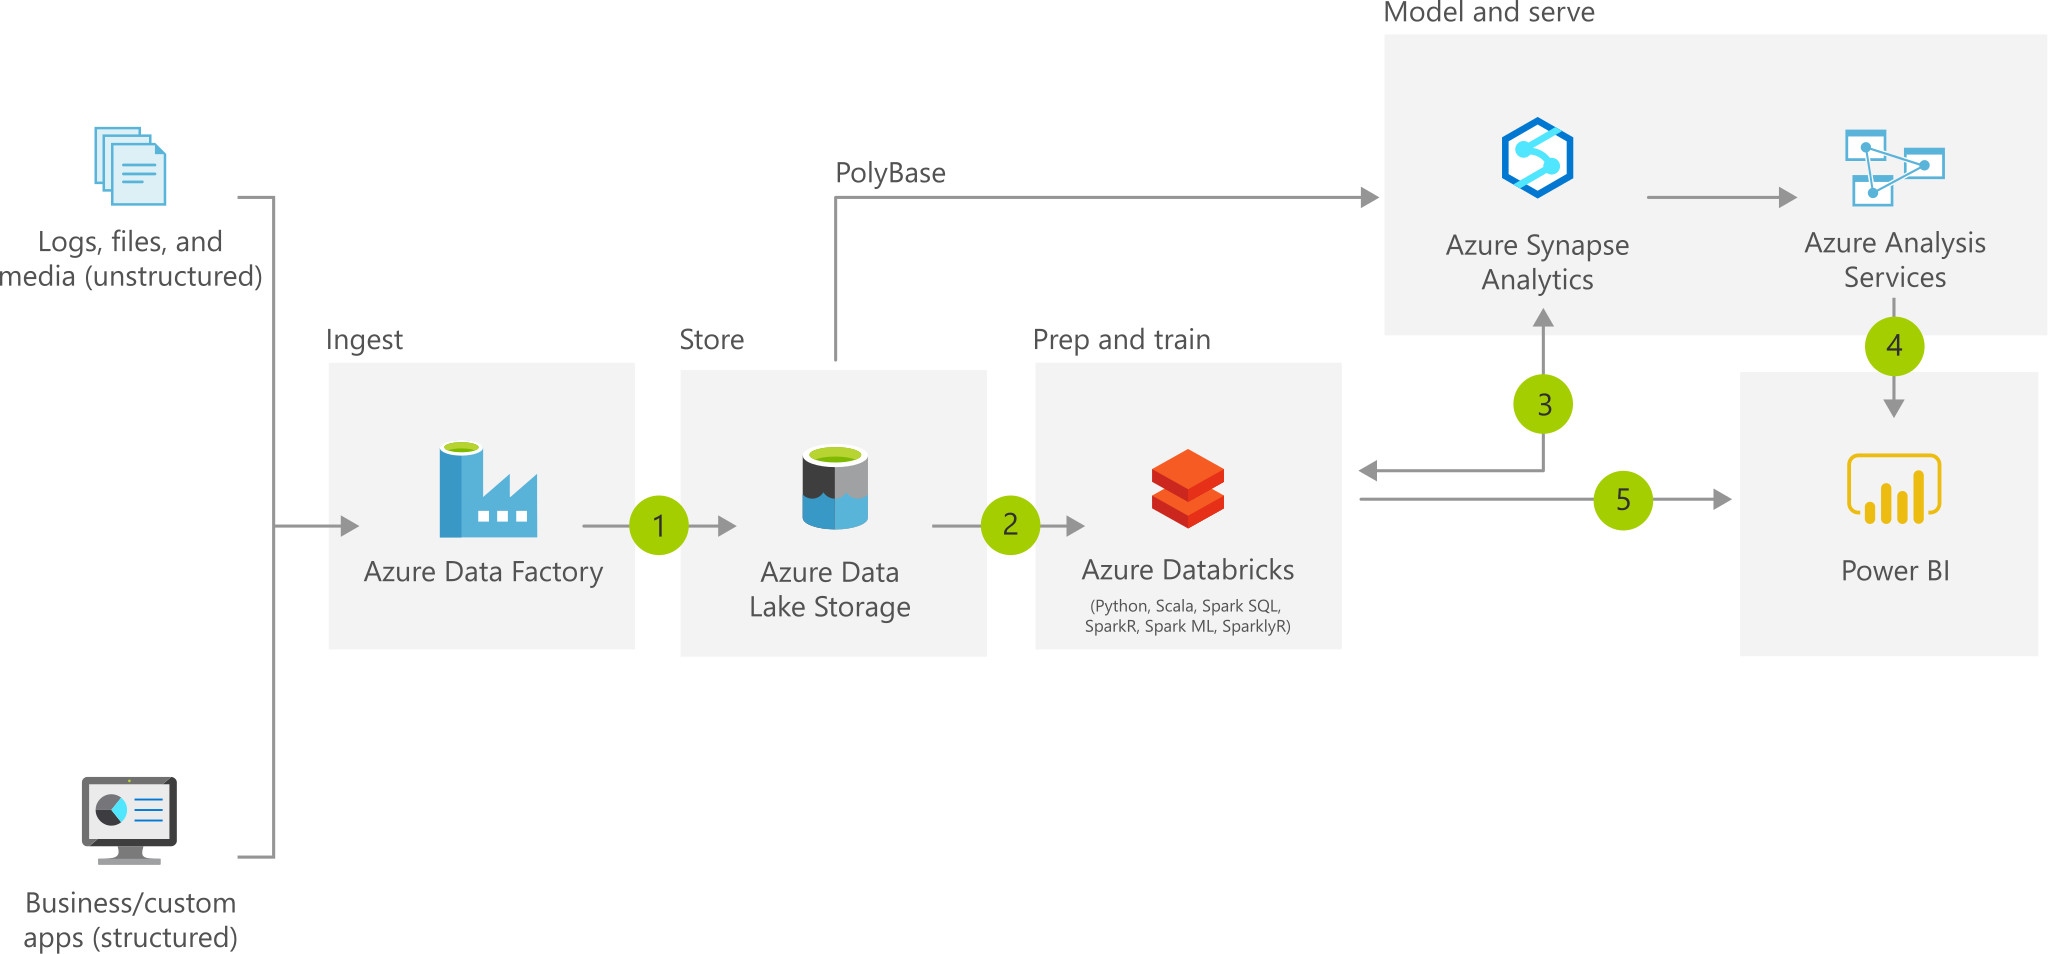
Architecture overview of data flow for Modern Data Warehouse pattern in Azure
At a high level, you're going to load a representative, raw sample of data from your source systems into Azure, use that to define and build your processing and transformation jobs and pipelines, build your target database structure in Synapse, then load your processed data into the warehouse. After that, you can work on connecting directly to the source systems for the full data load, and parameterizing your pipelines by implementing a tumbling window approach to incrementally load new data.
I've collated my notes on things you might want to consider and technical decisions you're going to have to make at each of these stages as you build out your use case.
Landing your data #
To get you going, manually land a representative sample from your source systems into your storage account in the quickest way you can. Azure Storage Explorer is a really useful tool to copy data to your cloud storage from your local machine. It's recommended to use folders to separate your data between layers and sources - for now, land the data as-is into a Raw folder, with a folder for each source. Maintain any other partitioning/folder/file structure that the data has - you'll need this to be the same structure as if you got it from your source system in order to make sure the processes that you develop will continue to work once you hook up to your live system.
/Raw/Source1/2020/11/01/file.extension
Example folder structure in the Raw layer of your lake
As you process the data, write it back out into the lake into different folders - you'll typically have at least a Cleansed and Curated layer in your lake which represents your datasets as you tidy them up, join them together, and apply more structure and value. Writing data back out into different layers means you can store all of your data at the lowest cost possible, re-process data from your Raw layer if necessary (e.g. to add in additional columns that were previously thought of as unnecessary), and provide analysts or data scientists access to your data for advanced analytics workloads, if appropriate. You can find more guidance on structuring your data lake for batch processing here. Data lake design is beyond the scope of this article, but this blog post written by my colleauge Nick Hurt goes into more detail of Data Lake organisation and design, too.
Data engineering and data structure #
There are different ways to do this depending on how you like to work and your programming skills - you can write SQL scripts and transform data using SQL Serverless or your SQL pool in Azure Synapse, take a no-code approach using Mapping Data Flows, or code your transformations in SQL, Scala, PySpark, or R, to run in Azure Databricks or Synapse Spark pools. Your choice will also depend on the complexity of the transformations you need to perform. My recommendation here is to go with what feels comfortable to you - there are comprehensive guides to getting started with each of the above approaches that I've linked to at the bottom of this article.
Things you'll be thinking about as you process your data are standardising on common formats, removing unnecessary columns, and applying cleaning rules like data standardization (e.g. set names to all capital letters) and data validation (e.g. validate product or customer IDs). This should be pretty easy if your data is already in a relational format and you're extracting in flat files (like csvs) - if your data is coming in in non-relational formats like json or xml, this may require you to unpack nested data which you can do using Mapping Data Flows or Spark.
One thing you may want to think about at this stage is how you intend to manage updates to data in your analytical store. If you want to persist history and changes to data over time, you can rely on the tried and tested method of Slowly Changing Dimensions.
Slowly changing what? #
Slowly changing dimensions! These are a set of patterns that enable you to track history and changes in your data. There are different types of slowly changing dimensions - you can implement logic to process these as you load new data into your warehouse, and templates are included to do this with Mapping Data Flows out of the box, too.
NB: This is not a requirement - this is an MVP after all! You can always come back and add this logic into your processing pipelines later on.
Distributing data in Synapse #
You'll also have to think about how the data is distributed in Synapse to optimize the operations your tables across the warehouse - depending on the data volumes and purpose of your table, there are different choices; round-robin and hash distributed tables, or replicated tables.
- Round-robin distribution eveny and randomly distributes the data across all distributions. Loading data into round robin tables is fast, but query performance can be impacted as they can require more data movement. Consider round robin as a staring point, for tables that have no obvious column for hash distributing - it's also good for staging your data in Synapse before inserting to your production tables.
- Hash distribution is used when it makes sense to group data in a distriubtion based on a certain value, minimizing data movement and improving query performance. You could distribiute on any column, perhaps country code, product line, or userid. You'll need relatively high cardinality for a column hash distribution (100s or 1000s of values), and the table size on disk is more than 2 GB.
- For smaller, less frequently changing tables (e.g. dimensions) you might consider instead using replicated tables. This means a replica of the data will be stored in each distribution, saving shuffling of data which would degrade performance. Generally, 2GB or less is considered small, replicable table.
You can read more about distributed tables and design guidance in then documentation. This cheat sheet also gives a fantastic starter for designing your warehouse.
My final comment on this would be not to get too bogged down in the details here. Nothing that you build here will be fixed in stone, and you can expect to refine the decisions made as you address any performance issues at a later stage.
Loading from the lake into Synapse #
Once your data is prepared and in the right structure, and your target tables are created in your Synapse SQL pool, load your data from your storage account into Synapse using the copy activity. It's best practice to load your data into staging tables before inserting into production tables. Within the settings of your activity, you'll find an option of the function that should be used; PolyBase and the COPY command both use a parallel load routine, making them very efficient for big loads. Bulk insert is essentially batched INSERT statements of your data, so PolyBase or COPY are the preferred choices here.
Security and Authentication #
You can authorize users into Synapse with 2 authorization types; Azure Active Directory (AAD) Authentication, or SQL Authentication. There are a few steps to follow in order to enable Active Directory authentication, and these steps need to be performed by an administrator. Its best practice to use AAD authentication, and while it might feel a little more onerous to set up, the additional security it affords you is worth it.
Other performance tuning tricks to note #
- Ordered clustered column store indexes can be used to further improve performance - patterns where ordered CCI will help are documented here.
- Materialized views provide a low-friction mechanism for increasing performance by pre-calculating and maintaining the results of a view, rather than calculating the results at query time. This is all managed for you by Synapse, meaning the views get automatically refreshed as data gets loaded into the underlying tables. These can be a performant way to provide aggregations and calculations for downstream consumers.
- Result set caching can also improve query performance and reduce compute resource usage. The result set cache has 1TB storage per database, and requires a user with the
dbmanagerrole to turn it on. The cache will be invalidated if the underlying data changes too - the oldest results get removed from the cache to make space for new ones. NB: row level security cannot be applied with Result Set Cache on.
Further reading #
- Getting started with Mapping Data Flows
- Getting started with data transformation with SQL
- Getting started with data transformation in Databricks
Conclusion #
The above should help you understand what you need know when you're considering building out a data analytics capability using Azure Synapse (or any comparable technologies). If you're considering trialling this for yourself, I've recently discovered this useful guide that walks through the PoC process in a lot more detail that might be helpful, too.
Please message me on Bluesky if this has been helpful, or useless, or if you have any questions or comments!