Custom event-driven ETL with SQL, Azure Functions, Data Factory and Event Grid
Overview #
Metadata driven frameworks are very common in ETL scenarios - they make it faster to develop processes and provide more flexibility when processing data in your system. There are lots of ways to build and orchestrate these processes - Azure Data Factory has a metadata-driven copy wizard you can use to quickly build data movement pipelines, Microsoft MVP Paul Andrew has built an open source metadata framework on top of Data Factory called adf.procfwk, and many organisations build and maintain their own custom metadata-driven frameworks too.
I worked on a data warehouse migration project earlier this year which involved modernizing key portions of the workload from SSIS and SQL Server into Azure. This included extending the existing metadata-driven ETL framework to operate in the new cloud architecture. The project was a success and I learned a lot about migrating and modernizing complex data systems; unfortunately end-to-end job performance in the new cloud environment was degraded. We knew what the root cause of this issue was - a mix of insufficient bandwidth between on premises and cloud, and some shortcuts I made during the implementation phase to extract job metadata from the custom framework.
What were those shortcuts? Without getting too bogged down in the detail, the metadata parsing and job triggering was implemented in a data factory pipeline which, at it's highest frequency, could only be triggered once every minute. This was a stark difference to the original system which ran multiple times a second (!). I knew a more lightweight event-driven solution was possible, but ran out of time to implement it in the scope of the project. Naturally, this has been bugging me ever since - so I found some time over the last few weeks to re-visit and solve the problem.
Solution architecture #
Azure SQL bindings for Azure Functions was announced in preview at the beginning of this year and I always thought this would form part of the solution. Unfortunately you can't yet trigger a function on updates to a table - only input and output bindings are supported, but that's enough for a working solution:
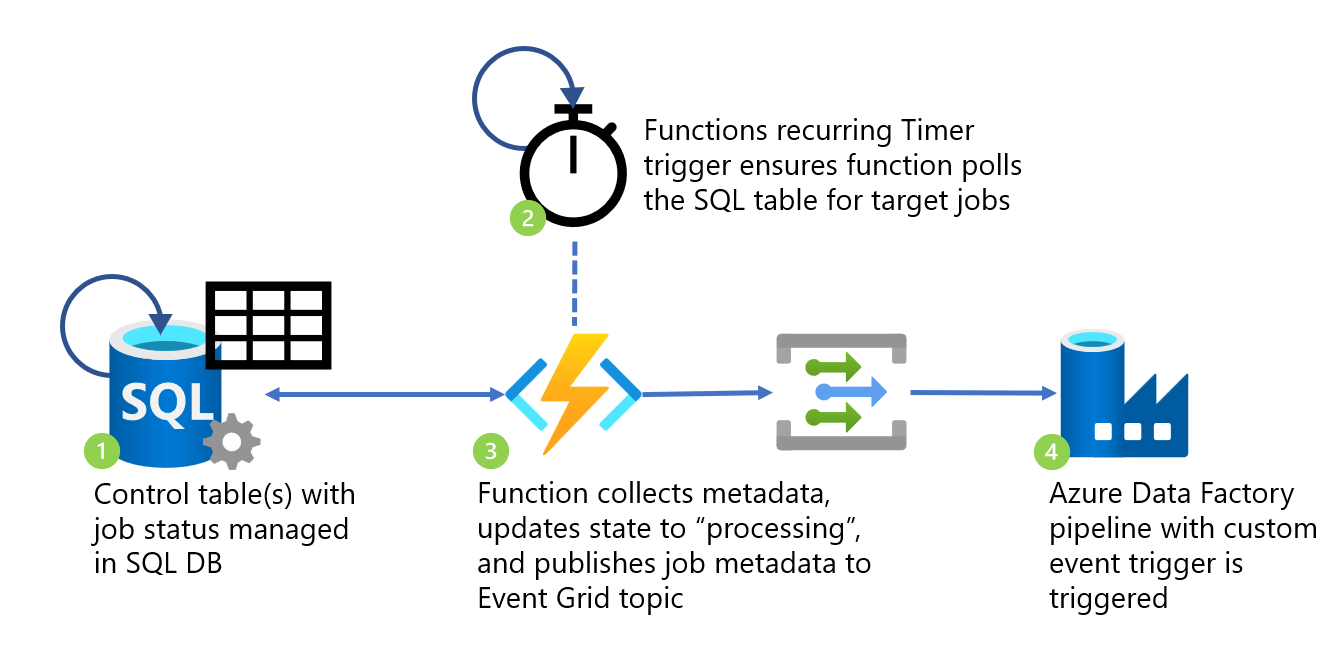
Processing flow #
- Metadata control table(s) with job status managed in SQL DB. SQL Server Agent Job manages job provisioning.
- Azure Functions recurring Timer trigger ensures function polls the SQL table for target jobs event-driven processes.
- Azure Function collects jobs from metadata table in “Started” state, updates state to “processing”, and publishes an event with job metadata to Event Grid topic.
- Azure Data Factory pipeline with custom event trigger is triggered, parsing metadata from inbound event for use in pipeline.
The sample code for the pipeline, function, and database table are available on GitHub. For a more detailed runthrough of how to implement this in your own environment, keep reading below!
Prerequisites #
Local environment
- Microsoft SQL instance - this can be any flavor of MSSQL. For ease of development in a Linux environment, I recommend running the SQL Server Linux container image with Docker, but any Microsoft SQL will do.
- Azurite Storage Emulator - similarly, for local development of Azure Functions I recommend the Azurite Storage Emulator container, also available via container image.
- Azure Functions - for more details on setting up your local environment for Azure Functions development check the documentation.
- Azure Functions Core Tools - The SQL bindings extension is part of a preview extension bundle (v4.x). See this GitHub issue for details on updating core tools in your local environment.
- Azure Functions Preview - Ensure that the
requirements.txtof the deployed app specifiesazure-functions==1.11.3b1.
Cloud environment
- Event Grid Topic - Create an event grid topic in your Azure Subscription. Note the Topic URI and Topic Key.
- Azure Data Factory - Create an Azure Data Factory
SQL #
After starting your database service, you're ready to create the few objects required for this demo. If you are using the Linux container image, there are some steps you need to go through to update the password after you've started the container, all detailed in the documentation.
Create Job Table #
Connect to your SQL database with SSMS or Azure Data Studio. Execute the below script to create a sample database and job table:
CREATE DATABASE test;

CREATE TABLE dbo.ToDo (
    [JobId] int not null,
    [JobStepId] int not null primary key,
    [JobName] nvarchar(200) not null,
    [JobStepName] nvarchar(200) not null,
    [JobStepType] int not null,
    [JobStepStatus] nvarchar(200) not null,
    [JobMetadata] nvarchar(200) null
);
Insert a sample job
INSERT INTO dbo.ToDo
([JobId], [JobStepId],[JobName],[JobStepName],[JobStepType],[JobStepStatus],[JobMetadata])
VALUES
(3012, 301201, 'Sample Job', 'First step of job', 6, 'Started', '{"jobmetadata":"examplepayload"}');
Take a note of your user ID and password. You'll need these when setting up the bindings in your Azure Function.
Azure Function #
Create new function #
Start by creating a new directory, then open this in VS Code. When you're in your empty directory, open the command palette (ctrl + shift + p), then find and select Azure Functions: Create Function. You'll then have to answer a series of prompts about the new function.
- Select a language for your function project: Choose Python.
- Select a Python alias to create a virtual environment: Choose the location of your Python interpreter. If the location isn't shown, type in the full path to your Python binary.
- Select a template for your project's first function: Choose HTTP trigger. NB: in the initial design above, I recommend use of the timer trigger. For simplicity, we will use the HTTP trigger in this example function.
- Provide a function name: Leave this as HTTPTrigger1.
- Authorization level: Choose Anonymous, which enables anyone to call your function endpoint. You can find more information about access keys for functions here.
Update __init__.py with the following code:
import datetime, json, uuid
import azure.functions as func


def main(req: func.HttpRequest, jobItems: func.SqlRowList, outputEvent: func.Out[func.EventGridOutputEvent], jobItemsUpdate: func.Out[func.SqlRow] ) -> func.HttpResponse:
    rows = list(map(lambda r: json.loads(r.to_json()), jobItems))

    # Update status for inbound jobs
    for i in rows:
        i.update({"JobStepStatus": "ADF_Processing"})

    # Set ouputs
    outputEvent.set(func.EventGridOutputEvent(id=str(uuid.uuid4()), subject="adf-test-subject", event_type="adf-event-1",
                    data=rows, event_time=datetime.datetime.utcnow(), data_version="1.0"))
    jobItemsUpdate.set(func.SqlRowList(rows))

    return func.HttpResponse(
        json.dumps(rows),
        status_code=200,
        mimetype="application/json"
    )
Add input and output bindings #
Update the function.json file to include the 1 input (from SQL) and 2 output (SQL and Event Grid) bindings. You can learn more about bindings, including supported services in the Reference section of the documentation
{
  "scriptFile": "__init__.py",
  "bindings": [
    {
      "authLevel": "anonymous",
      "type": "httpTrigger",
      "direction": "in",
      "name": "req",
      "methods": [
          "get"
      ]
  },
  {
      "type": "http",
      "direction": "out",
      "name": "$return"
  },
  {
      "name": "jobItems",
      "type": "sql",
      "direction": "in",
      "commandText": "select [JobId], [JobStepId],[JobName],[JobStepName],[JobStepType],[JobStepStatus],[JobMetadata] from dbo.ToDo where [JobStepType] = 6 and [JobStepStatus] = 'Started' ",
      "commandType": "Text",
      "connectionStringSetting": "SqlConnectionString"
  },
  {
    "name": "jobItemsUpdate",
    "type": "sql",
    "direction": "out",
    "commandText": "dbo.ToDo",
    "connectionStringSetting": "SqlConnectionString"
  },
  {
    "type": "eventGrid",
    "name": "outputEvent",
    "topicEndpointUri": "MyEventGridTopicUriSetting",
    "topicKeySetting": "MyEventGridTopicKeySetting",
    "direction": "out"
  }
  ]
}
Note the commandText in the sql input binding - here we can see the query that will be executed on our database to collect incoming data. In this example, we're looking for job metadata when the JobStepType = 6 and JobStepStatus = 'Started'.
Add secrets to local.settings.json #
Notice in the function.json the connection settings you need to add - SqlConnectionString for the SQL database, MyEventGridTopicUriSetting and MyEventGridTopicKeySetting for the Event Grid. If using the Azurite Storage Emulator, you can add the known development connection strings
  "SqlConnectionString": "Server=localhost,1433;Database=test;User Id=$USERNAME;Password=$YOUR_SECURE_PASSWORD;",
  "MyEventGridTopicUriSetting": "https://$EVENTGRIDTOPIC.westeurope-1.eventgrid.azure.net/api/events",
  "MyEventGridTopicKeySetting": "$EVENTGRIDKEY"
NB: also add "PYTHON_ISOLATE_WORKER_DEPENDENCIES": "1" as per this GitHub issue
Azure Data Factory #
Create data factory pipeline #
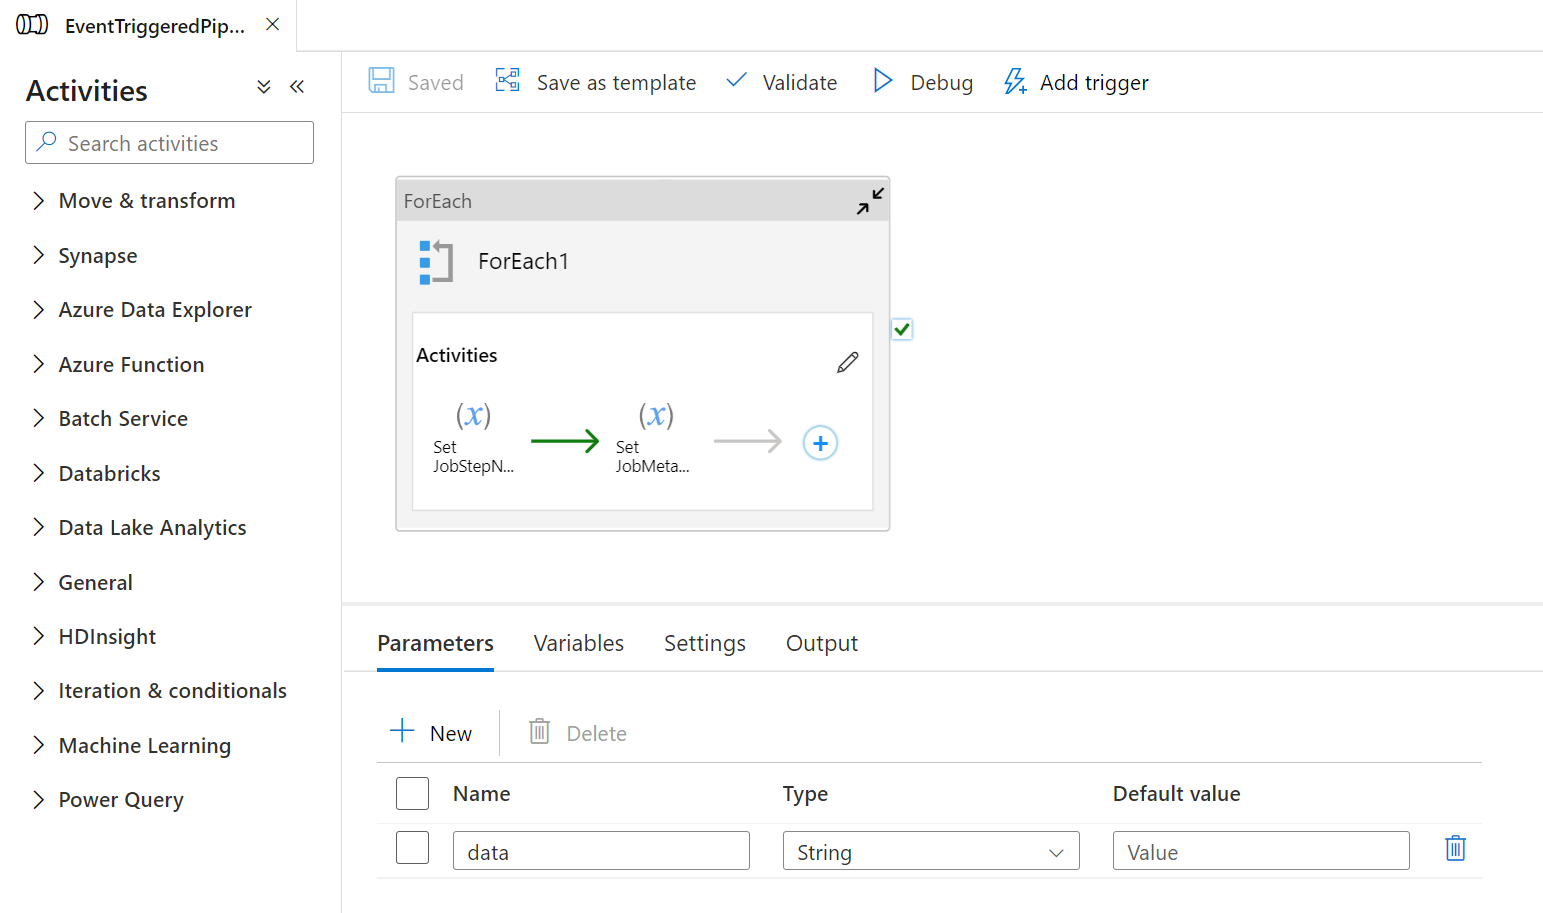
- Navigate to the Author tab of your data factory instance and create a new pipeline. Call it
EventTriggeredPipeline. - Add a pipeline parameter called
dataof typestring - Add two variables
JobStepNameandJobStepMetadata, both of typestring - Add a
ForEachactivity onto the canvas. Navigate to the settings tab and in the Items box put@array(pipeline().parameters.data). What is this doing? This is setting up the details of what theForEachloop will iterate over. In this example, it will be every row that satisifies the conditions of the SQL query that was added to thecommandTextin thesqlinput binding. -
- In the
ForEachloop, add twoSet Variableactivities. For theJobStepNamevariable, set the value as@item().JobStepName, forJobMetadata,@item().JobMetadata. Your pipeline is now complete and should look like the below image: -

Create Custom Event Trigger #
You are now going to create a custom event trigger to run the pipeline when events are written onto your Event Grid topic.
- Click
Add Trigger>New/Edit - At the top of the pane, select the dropdown box and click
+ New - Give the trigger a name e.g.
EventTrigger - Change type to
Custom Event - Use the Account selection method to select your subscription and Event Grid Topic name
- Optional: Apply Subject filters to your trigger. E.g. Subject begins with
adf - Click OK. This will bring up a new pane
Trigger Run Parameters - For the
dataparameter, put@triggerBody().event.dataas the value. This passes the Event data from the event on the Event Grid topic into the pipeline at execution time. - Click Save.
- Once save is complete, click Publish.
Putting it all together #
You are now ready to run your first event-driven trigger of the data factory pipeline.
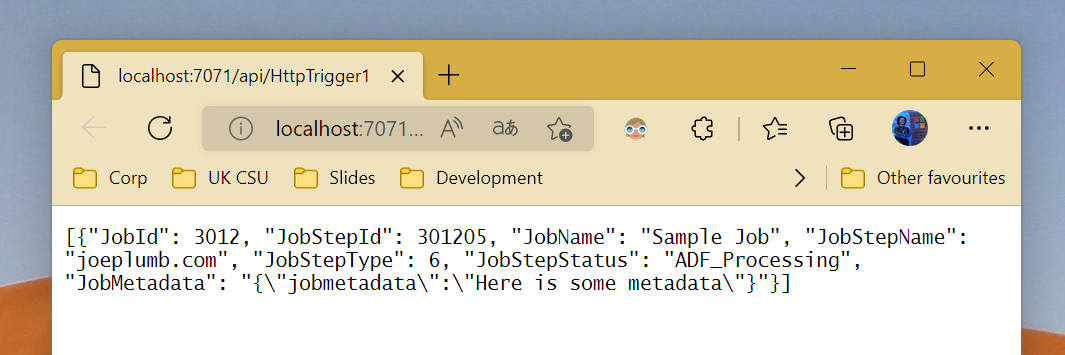
- Start the Azure Function in your local environment (press F5 or click
Run>Start debugging) - Trigger the Function via HTTP by navigating to the Function endpoint in your browser or calling via Postman e.g.
http://localhost:7071/api/HttpTrigger1 -
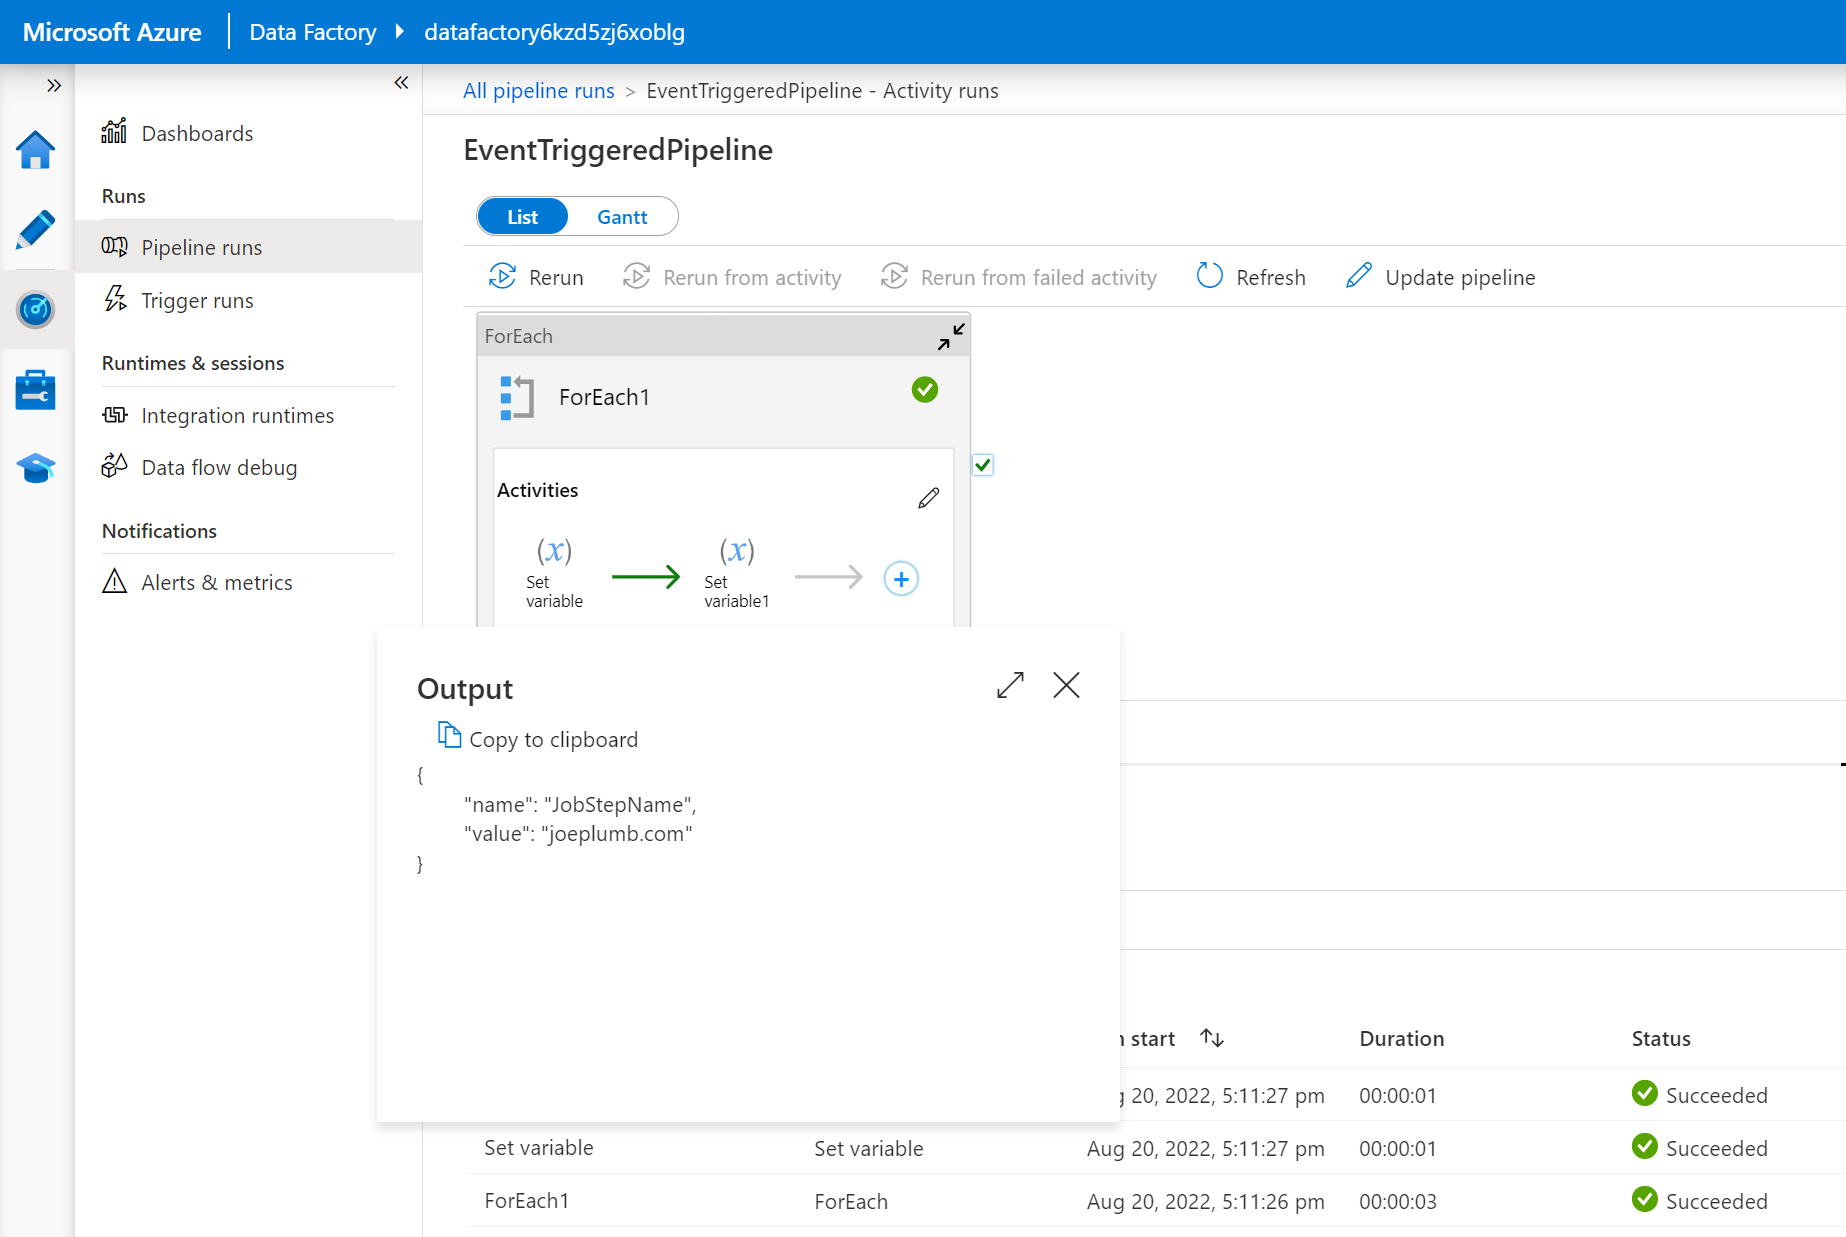
- Navigate to the
Monitortab >Trigger runsof your data factory and view the successful pipeline execution: -
Conclusion #
In this post, I've covered how to get started triggering pipelines in Azure Data Factory using data from MSSQL, with custom event triggers, Event Grid, and Azure Functions. Let me know if this was useful, good luck and happy building!
- Joe
Please message me on Bluesky if this has been helpful, or useless, or if you have any questions or comments!